Designing, installing and configuring WordPress in AWS is a great opportunity to get your hands dirty in the cloud. While it can sound simple and boring at first, it can be a surprisingly engaging learning experience. I have to admit that I learned a lot exploring and experimenting with different AWS services options. In this post I'll share the architecture that I built for a hypothetical customer.
Let’s define the requirements for my WordPress Solution.
Requirements
- Elasticity: The design needs to be scalable for all resources. In other words, I want to only pay for what I use.
- High availability: The website needs to be uptime exceeding 99.9%, or a maximum downtime of 52.6 minutes per year.
- Fault tolerant: The website needs to keep running in case of failures.
- Cost saving: Pay only for what's used.
- Globally accessibility: The website must be accessible globally, ensuring a fast page load experience for all users worldwide.
Proposed topology
Here's a solution I came up with based on the customer requirements.

Topology overview
It can be overwhelming at first, so let’s take a quick look at this topology and each service.
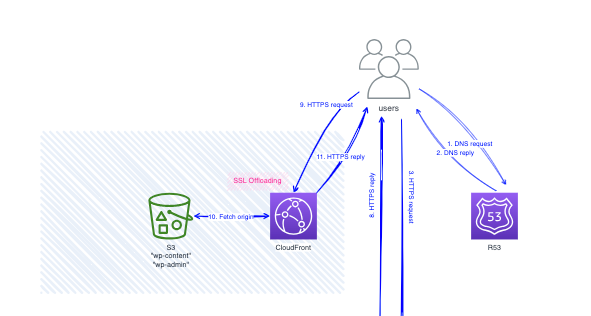
On the Internet, I propose R53 as DNS, CloudFront as a caching service, and S3 as the origin for the CloudFront distribution.
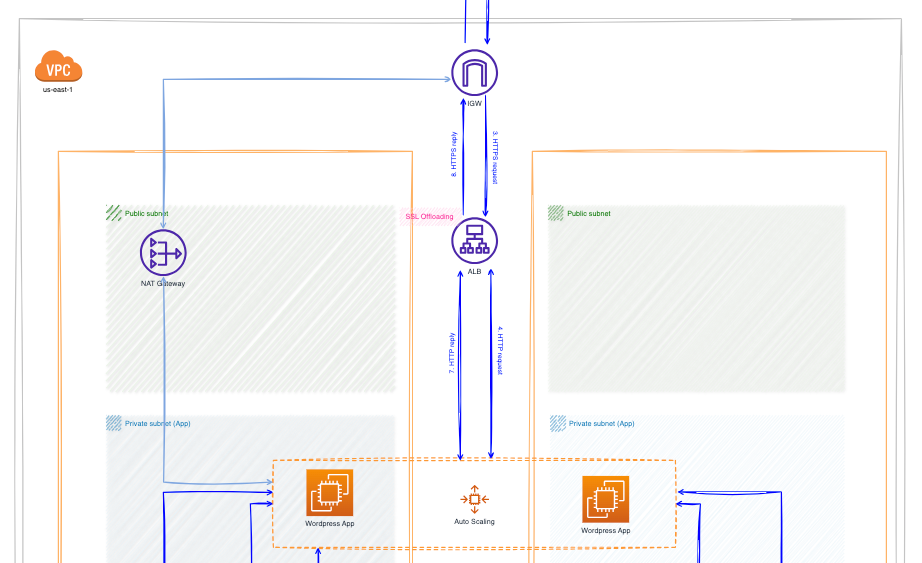
Inside the Virtual Private Cloud (VPC), the application is organised into three logical and physical tiers, known as a 3-tier architecture. This is a best application practice that promotes the independence of each tier from the others.
Here are the benefits of a 3-tier architecture:
- Modular Development and Scaling: Each tier of services can be developed and scaled independent, without relying on the other tiers.
- Enhanced Reliability and Troubleshooting: If a tier fails, troubleshooting becomes easier by focusing on the specific tier.
- Improved Security: By implementing the principle of least privilege, you can assign only the minimum necessary permission to each tier.
Each tier resides into a dedicated subnet: public, application, and data. The public subnet is the only one with internet access and contains the Application Load Balancer (ALB). The application and data tiers reside in private subnets, isolated from the internet.
Each subnet is secured with a security group that enforces the principle of least privilege. This means the security groups only allow the minimum required inbound and outbound traffic for each tier to function properly.
Elasticity is one of the beauties of using the cloud for your infrastructure. You only pay for what you use and you applications scale up/down as you need them. To achieve this in the WordPress solution, I propose:
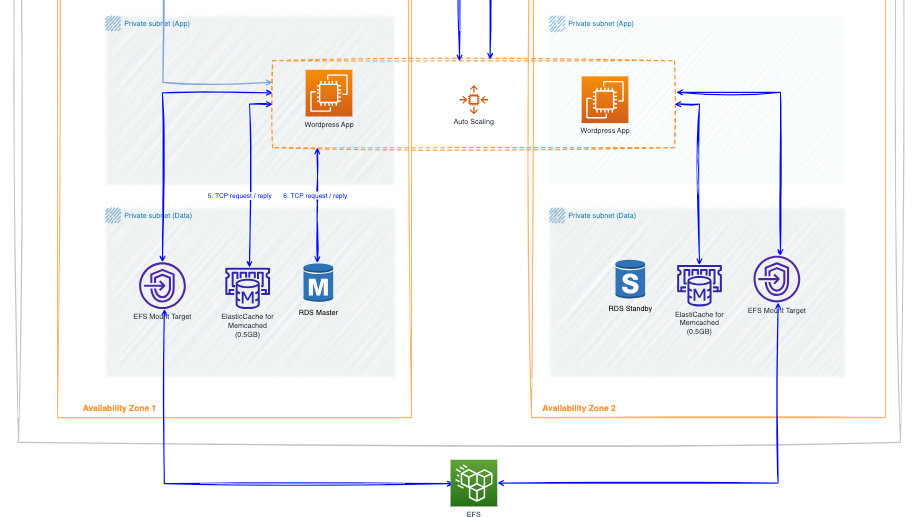
- Amazon Elastic File System (EFS) storage. EFS provides a scalable file system that can be shared and mounted on each EC2 instance as it spins up. This allows you to maintain a single WordPress installation accessible by all instances!
- Auto Scaling group. It's used for EC2 instances to automatically scale resources up or down based on usage. This ensures high availability (HA) by starting with a minimum of two instances, one in each Availability Zone (AZ).
Additionally, AWS managed resources like ALB, VPC, CloudFront, S3, EFS and Route 53 are maintained and automatically scaled by AWS.
Another important aspect to consider is the application's ability to handle potential traffic spikes. To achieve this, the application is designed to avoid scaling EC2 instances by using CloudFront. This allows you to start with smaller, more cost-effective instances. A similar concept applies for all the queries that might do the EC2 instances to the database, having the data cached using ElastiCache. This reduces the database load.
By using CloudFront and ALB, you can benefit from free SSL/TLS certificates. This means you can install a certificate in AWS Certificate Manager (ACM) and use it with both services. This setup allows you to offload SSL processing from your EC2 instances. CloudFront and ALB will decrypt the HTTPS traffic from your users and then forward it to your EC2 instances in unencrypted HTTP format. The encryption for the outbound traffic to the Internet happens when the traffic goes back to the users.
Monitoring is crucial in every application. You cannot leave an infrastructure running without knowing what's happening. CloudWatch allows you to create dashboards and alarms to monitor AWS services. Don't forget to configure it, it will save you headaches when things go wrong.
How does the traffic flow from the users to the WordPress website?
Understanding how traffic flows is important for configuring your AWS topology effectively. Here’s a breakdown of four key components: CloudFront, ALB, Auto Scaling group and storage.
Let's deep dive to it!
1. CloudFront
When a customer visits your website from anywhere in the world, they first enter the URL (eg, www.yourwebsite.com) into their browser. This triggers a lookup with the Domain Name System (DNS) service, which in my case utilises R53.

The DNS query response directs the customer to the IP address of the Application Load Balance (ALB), which handles dynamic content requests, such as post content stored in the RDS database.
The query to the ALB goes to a healthy EC2 instance hosting the WordPress web server. Wordpress has the W3 Total Cache plugin installed, which rewrites the HTML to use static URLs pointing to the CloudFront distribution.
The CloudFront URL looks like https://dgbah0z141b3e.cloudfront.net/, where the characters in the subdomain are your Cloudfront distribution ID.For static content, such as CSS and image files, CloudFront is configured to match the paths containing these files. In WordPress terms, this typically translate to path like: wp-content/* and wp-includes/*. Any traffic not matching these static content paths is considered dynamic and goes to the ALB.
CloudFront fetches static content directly from the S3 bucket configured by the W3 Total Cache plugin. The content sync of this bucket is leveraged by using plugins like W3 Total Cache (see a separate post for detailed instructions on how to install and configure it).
For URL static paths, CloudFront can be configured to rewrite requests from the CloudFront URL (like https://dgbah0z141b3e.cloudfront.net/) to your domain
This domain name translation triggers a DNS lookup, directing the customer to the nearest CloudFront Edge location’s IP address. This ensures a faster and more efficient connection, especially for larger files like images, which are delivered from the closest edge location to the user. Great!
Once the client got the IP address, it attempts to connect to the static website content cached by CloudFront. If the requested content isn’t present in the CloudFront location's cache, the distribution fetches the data from its origin, which in my case is the S3 bucket.
To optimise performance, CloudFront and ALB handle HTTPS connections, freeing up web servers from the decryption process.
2. ALB
When a HTTPS request reaches the ALB, it's decrypted by the load balancer. Then, the request is forwarded to one of the healthy targets, which are EC2 instances. Similar happens when the traffic returns from the EC2 instances to the ALB, and then encrypted by the ALB before being sent back to Internet.

3. Auto Scaling group
All EC2 instances belong to the Auto Scaling group, which treats them as a logical unit for management and scaling purposed. A launch template defines the configuration requirements of the group, such as the instance type, the AMI (Amazon Machine Image) to launch, the minimum or maximum number of required instances, etc.

4. Storage
In this section, we'll discuss the three types of storage used in this architecture: EFS, RDS database, and ElasticCache.

- EFS is a storage service used for data that doesn't need to be accessed by the customer. It's used by the Wordpress to store its installation files and plugins in a centralised location.
- An RDS database with Multi-AZ provides high availability. This means there's a primary database (master) in one AZ and standby replica in another AZ. Customer traffic from the EC2 instance always sends a request to the master database. The standby replica cannot be used for reads by default. However, in case of a master failure, failover occurs and the standby is promoted to become the new master.
- ElastiCache for Memcached is used to cache data accessed by EC2 instances, reducing the load on the RDS database. Here's how it works: when an EC2 instance request data from the database, it first checks the ElastiCache cluster. If the data is found in the cache (cache hit), the EC2 instance retrieves it from there, reducing the need to query the RDS database. This process is called caching and helps to offload frequently accessed data from the database, improving performance.
Traffic Flow Summary
- User Requests a Webpage:
- User enters the website URL in their browser (e.g.,
www.mywebsite.com). - DNS lookup, using R53, translates the URL to the IP address of the Application Load Balancer (ALB).
- ALB Distributes Traffic:
- The request reaches the ALB, which manages dynamic content requests.
- The ALB decrypts the HTTPS request. The inverse happens for the outgoing traffic.
- The ALB identifies a healthy EC2 instance running WordPress and forwards the HTTP request.
- WordPress Processes the Request:
- The EC2 instance receives the request and it’s processed by WordPress engine.
- WordPress might interact with the RDS database to retrieve dynamic content (e.g., posts). Memcached is between EC2 and database to offload the queries to it.
- If the requested content is static (e.g., images, CSS), WordPress is configured to rewrite the URLs to CloudFront for faster delivery.
- CloudFront Delivers Static Content:
- The user's browser receives the HTML page with CloudFront URLs for static content.
- As the page loads in the browse, a new HTTPS query is done to CloudFront to retrieves the static content. In case there’s no cache hit the CloudFront Edge location gets the object from the origin, S3 bucket.
- Dynamic Content and Return Path:
- Any request that isn't static content (e.g., user login, form submission) is considered dynamic and goes back to the ALB and EC2 instances.
- The instance might interact with the RDS database to handle the dynamic request. Memcached is not checked.
- The ALB then returns the response to the user's browser.
Conclusion
This is a great way to get some hands-on Cloud experience and learn the ropes. WordPress is crazy popular all over the world, so it's definitely useful to know how you can set it up in the AWS Cloud to make it highly available and super fast no matter where folks access it from. Of course your solution will change depending on what each customer needs. For your own personal use, you could even spin up an AWS LightSail instance that has WordPress pre-installed and ready to go.
And that wraps up our cloud WordPress adventure! Whether you're looking to boost your own personal site or build client solutions on AWS, I hope you feel empowered to experiment and explore. Now go out there, have fun getting your hands dirty with infrastructure.
Happy Cloud Architecting!


